
Adding An Electronic Signature To A PDF With Workiro
Blog
Throughout the business world, it’s become standard practice to issue key proposals and legal documents as PDFs. This is due to the file format’s strong security options, change tracking, and broad compatibility. It’s a smarter choice than any word-processing format because it doesn’t require proprietary software to view: any internet browser will do, for a start.
It’s also standard to have important documents electronically signed by relevant parties to indicate approval, a process that replaces the traditional process of signing physical copies. This is easily handled through Workiro’s electronic signature request process. In the event that you need to add your electronic signature to a PDF, you can get it done within minutes. Here’s how.
How to request a PDF document signature
If you need to get someone else’s signature, or you’d like to sign a document you’ve received from outside Workiro, you’ll need to create the signature request. Here’s the basic process:
1. Access a live Workiro account. Whether you’re signing or requesting, you need to be able to get into a live Workiro account, so that’s where you must start. If you’ve yet to use the free trial, you can use it to get your task done (and generally test the system).
2. Open a signature thread. Look to the top-left of the Workiro dashboard and you’ll see a Create button with a pencil-on-a-piece-of-paper icon. Select the 'Signature' task/request option.
%2520GetBusy.png)
3. Add all the signers and participants. If you’re intending to sign the document yourself, you don’t need to do anything here: you’ll initially be the only participant. If you’re sending it to someone else, click the plus symbol and provide their email address (or choose from your Workiro contacts list).
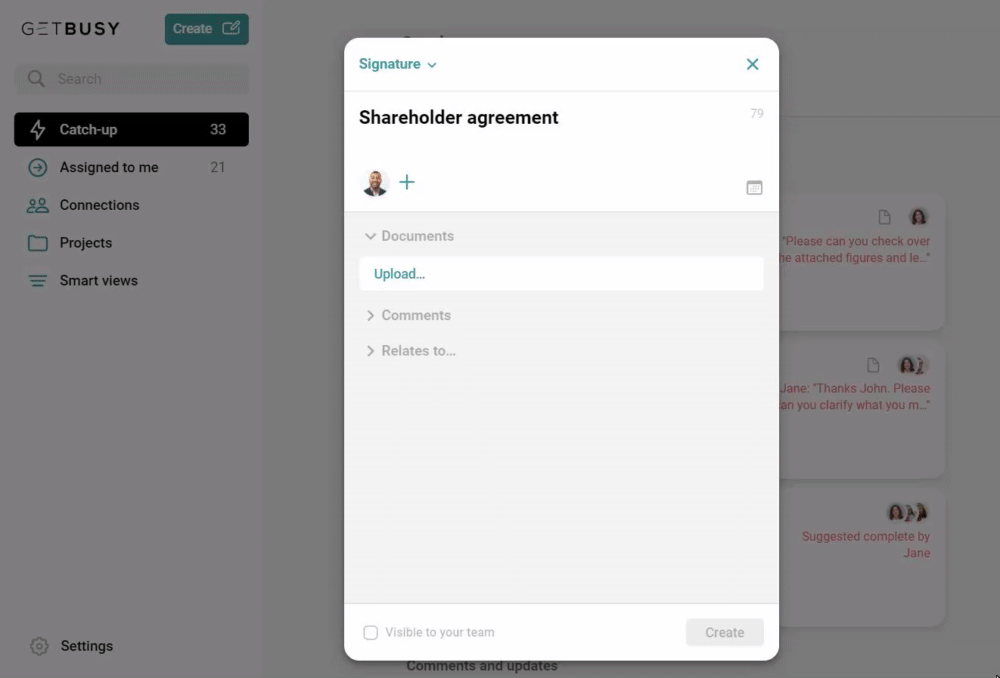
4. Choose and upload the PDF document/s to be signed. Under 'Documents', click to 'Upload' your pdf document that you need signing, then choose it from a local source or a cloud source. Alternatively just drag and drop your pdf file on the task window. There’s a size cap of 200mb, but it’s very unlikely that a suitable PDF document of this kind will exceed this. You can even add up to 25 separate files to a single signing task, so they can be discussed and signed as a batch as part of one task/thread.
%2520GetBusy.png)
5. Prepare the document/s for signing. With the document added, you’ll see a “Prepare” option next to the listing and choose between either simple one-click approval (quick signing) or advanced signing options if you require drawn signatures or extra information entered. Just drag-and-drop signing and text fields wherever needed on the document and choose who needs to complete each field (which can be you).

6. Finish creating the signing task. Once the document has been set up for signing and any extra details have been added, click 'Create' and the request will be ready to go. If you’re the one doing the signing, you can proceed directly to signing. If there’s another recipient, they’ll receive an email notifying them, but you can also nudge them through Workiro (or contact them manually).
How to sign a PDF document online
When you need to sign an online document being supplied from elsewhere, you’ll want the person responsible for providing the document to create a signature request and notify you of it. Alternatively if you've already received the document via email, you can simply upload the document into Workiro yourself as a signing task for yourself, but including the person who you would send back to, so that they'll instantly see and receive the signed document once you've signed it through Workiro.
Overall, the process of digitally signing your approval is extremely simple and can be accessed and completed from anywhere on any device:
1. Select the signature request. The creation of the signature request will have triggered an automatic email to your address, and you may also have received a nudge. Follow the provided link. Alternatively, you can start from the Workiro homepage and find the request in your assigned tasks once you’ve logged in.
2. View the document. When you click on the signature request, you’ll see a timeline of actions taken, and the addition of the document will be there. Click on that link or click on the “Read & sign…” button above the chat to open the document.
3. Sign and complete the document. With the document open, you’ll see the field/s assigned to you to complete. You can quickly move between them using the links in the navigation bar on the left, especially if the document has multiple pages. If there’s required text, add it. Each signature field presents two options: draw a signature, or submit a simple text-based signature which will default to your full name. Use whichever approach you prefer.
4. Save and close the document. When you’ve added everything needed, you can click on “Save & finish” at the top left to exit and send the document. Your task is now finished. The signed document will be instantly available with an additional Signature Certificate page of details appended, listing a unique identifier for the signature, the IP address you connected from, and when it happened to verify and validate the signed document.
Note that digital signature of a PDF is all you’ll need, as all sensible companies now understand. Should you need to work with someone who doesn’t trust the security of a signed PDF document, remind them that a physical signature can be faked or unknowingly added to the wrong document. Trusting online security is actually a notable step up.
Want to find out more about Workiro’s digital signature app? Book a demo if you’d like to speak to one of our consultants for further information.
.png)